Guidelines for Poster Preparation
1. Structure of Poster Presentations
Each poster session will last 100 minutes. This will allow the poster presenters to explain their findings in considerable depth to audiences that are interested directly in the paper.
It is strongly recommended that authors turn up 10 minutes before the session starts in order to set up their poster. Materials to attach the papers to the boards will be available at the conference venue.
All of the poster materials will be provided by the author(s).
The poster must be up by the start of the listed poster session times. Once the session is complete, the author should remove their poster promptly to make way for the next poster session.
2. Preparation of Poster Presentations
Each presenter is required to prepare visual material (e.g., black-and-white or colour sheets of paper, photographs, or a single large poster) to be displayed on a board, which will be 1.96m by 0.95m. The text in the visual material should not be smaller than 14 points. A typical structure of a poster presentation is similar to an oral presentation, and often includes:
- A title for the paper with the names of authors and their affiliations;
- Outline of the presentation;
- Motivation and problem definition;
- Background with a literature review;
- Main body of the paper;
- Key findings and their discussion;
- Conclusions and Future Work (if appropriate)
- Acknowledgements
3. Poster Board
Each presenter will be provided with a 1.96m by 0.95m board in the poster presentation hall (Hall 2, Scottish Exhibition & Conference Centre).
4. Structure of Poster Presentations
Use a few (i.e., perhaps 6 to 8) bullet-type charts, figures tables, equations, etc. to indicate as well as highlight the important technical content of your paper.
SIMPLY POSTING THE PAGES OF THE WRITTEN VERSION OF YOUR PAPER WILL NOT MAKE AN EFFECTIVE POSTER PRESENTATION.
Provide an introduction (outline) and a summary or conclusion for your poster paper presentation.
If you include a table on a poster, place a descriptive title in large characters at the top of the table. If you include a graph, write a descriptive title in large characters at the bottom of the graph. Label both axes with the physical quantity and its units. Please use SI units exclusively.
If possible, figures should be self-explanatory
5. Visual Aids (Good Practice)
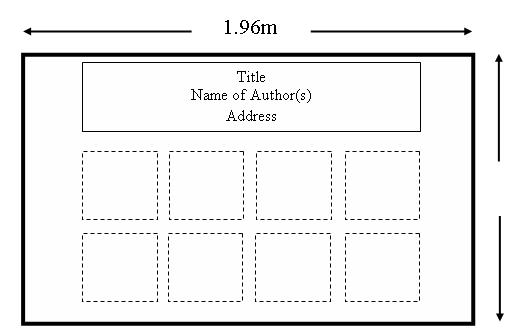
The headline of your poster containing title, and the name(s) of the author(s) should be included at the top of the Poster as a Banner (see sketch below).
Make sure that you can read your poster from a distance of about 3 m. PLEASE PRINT. Make the lettering at least 1 cm high. The strokes with which the letters are formed should be about 1 mm wide. Anything smaller cannot be read from a distance of 3 metres.
All graphs and charts should be at least 25 cm x 30 cm or preferably even larger.
It is a good idea to number your materials sequentially. This will indicate to the reviewer a logical progression through your poster presentation.
6. Presentations
It is very helpful to have on hand copies of the written version of your paper and recent publications, as well as a supply of business cards for viewers who may want to study aspects of your work in more detail. Some viewers may wish to contact you later.
If possible use colour to make your poster stand out. Colour makes your poster more interesting and can be used to trace the flow of information or to help distinguish between different parts of the poster, thus clarifying your message. Colour can also make a graph or chart easier to understand. Limit yourself to a few colours that complement each other. Be consistent in your use, and contrast dark colours on a light background or vice versa. Note however, colour is not a necessary requirement. It is effective but not essential.
7. Poster Layout
Back to Top |

